
Preface
The analytical work on the google research football project involved in this article is completed during the internship at Intel. Thanks again to Qiyuan Gong & Shengsheng Huang for their kind guidance and mentoring, and also many thanks to those who helped me during this period of time.
About the project description, please refer to the previous post Google Research Football - RL Environment on my personal website, which is the summary of the Google Football paper.
Working Environment Setting
Assuming that we have two local workstations W and L with Windows and linux installed respectively, one gateway server G and one remote server S, we now introduce some user-friendly developping tools before getting started. Note that the tools/softwares in this section are not necessary once you have alternatives.
For W:
- Pycharm (professional): available once you have an edu email, which allows you to deploy, develop, debug remotely. https://www.jetbrains.com/pycharm/
- MobaXTerm: powerful remote shell software. It can save your remote ssh session, without typing the password repeatedly. https://mobaxterm.mobatek.net/
- VNC viewer: will be used when there is need to run graphical programs on the remote server. https://www.realvnc.com/en/connect/download/viewer/
For L:
- oh my zsh: fancier version of the linux bash, multiple useful plugins for customizing your own bash experience. https://ohmyz.sh/
SSH Tunneling
If you are working in a big corporation like Intel, you will need to interact with the remote server through the gateway node, thus understanding SSH tunneling is a must.
SSH tunneling process is used for the packet forwarding. For example, when W cannot directly access the IP address of the remote server S, the SSH tunneling mechanisfm can create a process running on the gateway node G that listens to one port (on W) and forward any request to another port (on S). By doing so, we make W look like directly connected to the remote server S.
To start a SSH tunneling process, type in the following command on your local workstation:
1 | ssh -N -f -L <port of L>:<IP of G>:<port of S> <username of S>@<IP of S> |
in which the arguments represent different meanings:
- -N: Do not execute a remote command. This is useful for just forwarding ports.
- -f: Requests ssh to go to background just before command execution.
- -L: Specifies that connections to the given TCP port or Unix socket on the local (client) host are to be forwarded to the given host and port, or Unix socket, on the remote side.
If you are working on W, then the MobaXTerm has a pretty good UI for you to set the tunneling configuration and you don’t need to use this command. The SSH tunneling exists everywhere if there is a requirement for connection through the gateway node.
For more information about SSH tunneling, please refer to the following websites/blogs.
Running GFootball Locally
Running Google Football locally doesn’t require any more techniques than mentioned in their github repo. First you need to prepare a Linux Environment (on your local workstation L). Then get the root authority and download the following packages by runninng ‘apt-get install’.
1 | sudo apt-get install git cmake build-essential libgl1-mesa-dev libsdl2-dev libsdl2-image-dev libsdl2-ttf-dev libsdl2-gfx-dev libboost-all-dev libdirectfb-dev libst-dev mesa-utils xvfb x11vnc libsqlite3-dev glee-dev libsdl-sge-dev python3-pip |
The packages above are mainly for OpenGL rendering (including libgl1-mesa-dev and so on) and VNC remote rendering (including xvfb and x11vnc). There may be sometimes an error showing up indicating that some of the packages couldn’t be installed because the dependency tree can’t be resolved. When encounterd with that, I suggest that you choose another machine with clean environment and start the previous process all over again.
After the installation of the packages, we then install the google football by pip, to note here that the pip version matters (remember to downgrade it to 18.1), since the ‘parse-dependency-links’ option is not available for the higher version of pip. This installation issue lately has some update, for more information please refer to this installation issue.
1 | pip install pip==18.1 |
Finally run the simple example of the google football by playing the game yourself, in case that the OpenGL version is not compatible, I suggest adding some ENV parameter as follows. You can check this issue for more information.
1 | MESA_GL_VERSION_OVERRIDE=3.2 MESA_GLSL_VERSION_OVERRIDE=150 python3 -m gfootball.play_game |
For the full doc of running google football, please visit the README file in the official repo.
Running GFootball Remotely
X Window System
When training the google football agent remotely on a server without rendering, there is nothing to worry about. But what if one wants to use the rendered pixels as the environment representation (observation), or wants to supervise the training process in a more intuitive way? Before diving into the solution/actual code to this problem, we need to understand how a Linux graphical system works, since it involves the rendering system. Please check X Window System on wikipedia.
The X Window System (X11) is a windowing system for bitmap displays, commonly on Unix-like operating systems. X is of a typical C/S architecture, where there is a X server residing between the input/output hardware drives (keyboard, mouse, screen) and the user programs, which act as X clients. When a user program wants to display something on the screen, it has to pull up a request to the X server, and then the X server needs to find the frame buffer of the screen and execute the rendering commands sent from the client program, i.e., writing bits into the frame buffer. That’s all we need to know in this section.
When we are running google football on the workstation, the X server and the X client are both on the same machine. While when we try to run it remotely on the server S and want to see the rendering results on the local workstation W/L, the X server and the X client are sperate: X server on the local W/L, while the X client (google football) on the server S.
The all-important fact to know is that those packages needed by rendering should be installed where rendering happens, namely, where the X server resides.
Local Linux System
If the local workstation is installed with the Linux system, then we could use the x11 forwarding mechanism. Which means if you install all the packages on your local workstation, you will make it.
The x11 forwarding techniques are not tested in this article. Hopefully you will succeed.
Local Windows System
Forget it! the MobaXTerm x11 forwarding mechanism doesn’t work! If you try to do so, you will receive a confusing error message which can’t be traced:
1 | "Couldn't load GL function glBegin: Video subsystem has not been initialized." |
On Windows system, we could use some simulated X server tools (such as Xming) to receive the rendering requests from the remote server, and the x11 feature provided by MobaXTerm follows this idea. But the fact that the google football requires so many packages that could only be installed on Linux system makes it impossible to use the x11 forwarding mechanism.
The basic idea to solve this problem is to put the X server back to the server S. Instead of letting the X server write the screen bits into the frame buffer, we use a portion of the hard drive space, pretending that it’s the frame buffer of the screen, and then forward the image to the local workstation W via network.
1. Set up the virtual frame buffer & message forwarding
First, login to the remote server and install the google football package (as shown in the previous section).
Then run the following two commands in the shell:
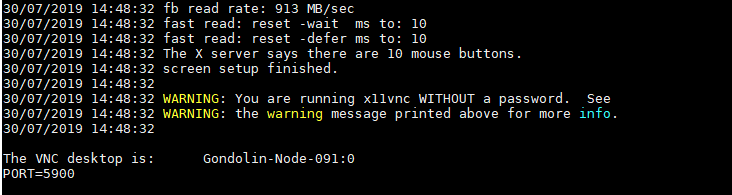
1 | Xvfb :1 -screen 0 800x600x24 & |
The first command Xvfb stands for X Virtual FrameBuffer. The :1 option denotes that this process starts a No.1 server, and the -screen option takes in 2 arguments: screen number and WxHxD, where D represents the color depth (measured by bits) of the screen.
The second command x11vnc (x11vnc man page) starts a process forwarding the dumped screen output to a certain port, where -display option should be binded with the previously executed Xvfb command; and -allow specifies the IP address allowed; The command will automatically search a port available from a certain port which is specified by -autoport option.
You need to remember the listening port number for future use, here we have 5900.
2. Set up the SSH tunneling
With the port 5900 set up, we can now forward the message to our local Windows machine. Run the following command:
1 | ssh -N -f -L 6666:<IP of G>:5900 <username of S>@<IP of S> |
To note here port 6666 is just a random local access point that you can designate at will for later VNC viewer.
3. VNC viewer connection
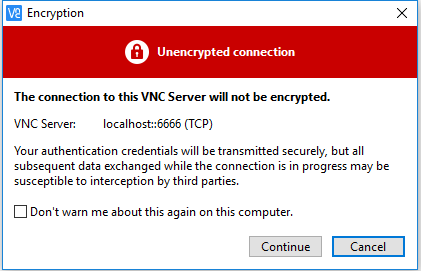
Open the VNC viewer. Type in localhost:6666 and set up the VNC connection. If the connection is built, there will be a warning console popping up as shown in the following figure. Click ‘continue’ and you will be all set.
4. Google Football Training
The training code is provided by google team in the file run_ppo.py. We should designate the exact screen it should be rendered by setting the DISPLAY environment paramter:
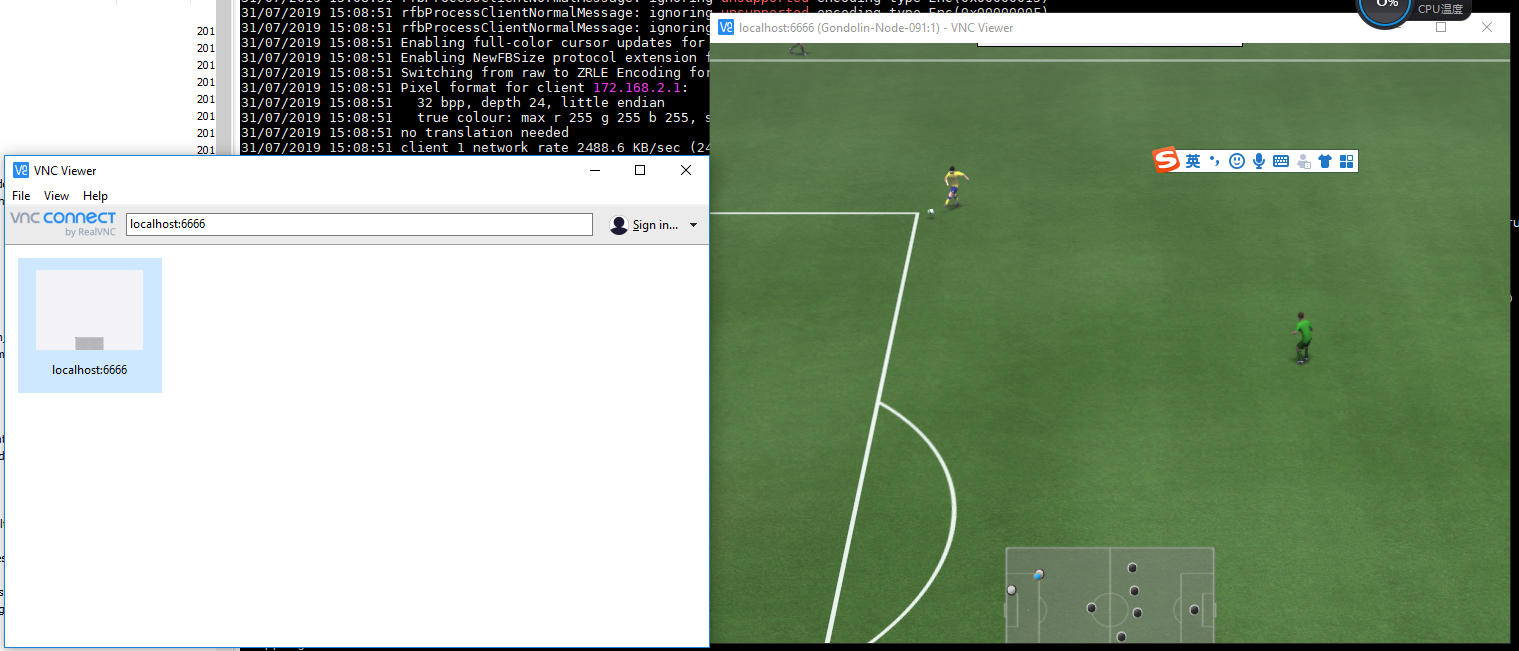
1 | env DISPLAY=:1.0 MESA_GL_VERSION_OVERRIDE=3.2 MESA_GLSL_VERSION_OVERRIDE=150 python3 -m gfootball.examples.run_ppo2 --dump_full_episodes=True --level=academy_run_to_score_with_keeper --render=True |
And the final result is shown. One thing to note here is that the refresh rate of the rendered picture is pretty low, therefore don’t get your expectation too high.
Experiments
Up to now we have conducted one experiment to reimplement the Shooting Bronze mini-game in FIFA18. The performance of the PPO algorithm is actually pretty good while it’s still sometimes influenced by the large training variance.
Setting
The football academy provided by the google research team has a very similar setting called academy_run_to_score_with_keeper.py in the scenarios folder, with the starting point of the player set in the middle of the field. By setting the ball nearer to the goal, and with some minor modification of the players’ position, we can reimplement the FIFA Shooting Bronze scenario in the google football.
Original Setting of academy_run_to_score_with_keeper.py
1 | builder.SetBallPosition(0.02, 0.0) |
Shooting Bronze Reimplementation
1 | builder.SetBallPosition(0.52, 0.0) |
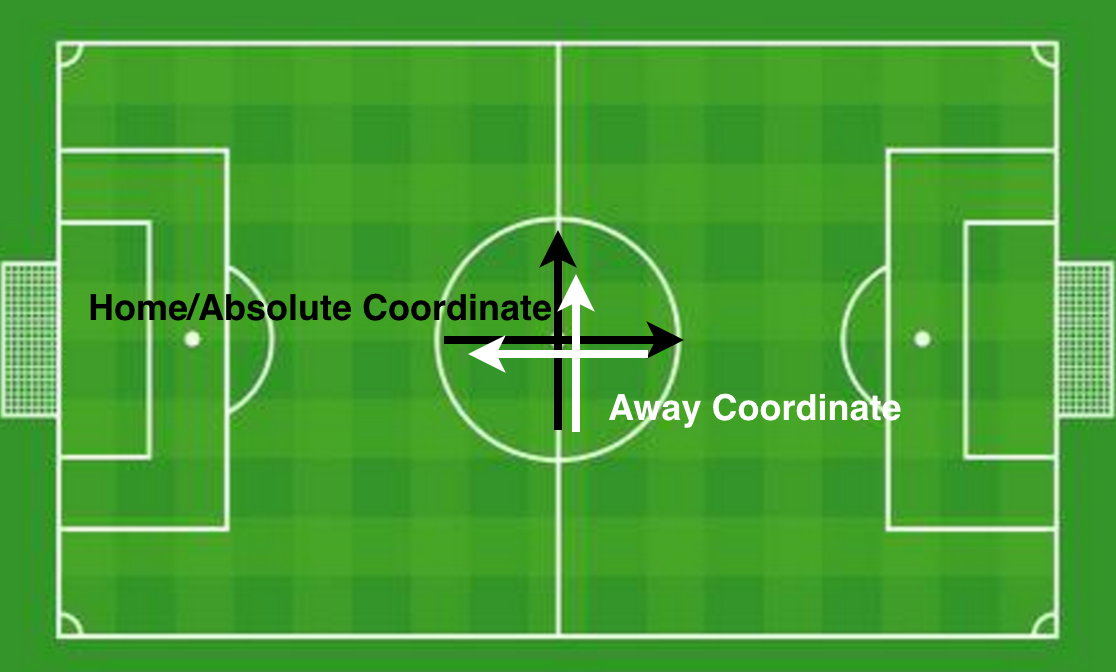
One crucial thing to understand here is that the setting procedure is imperative (like pyplot and matlab). The coordinate axis of the ball is absolute, while the coordinate axis of the team is relative, which is shown in the following figure.
Parallelism Performance
We tested the performance (accuracy, speed) of the single-machine PPO algorithm. The PPO algorithm runs the episodes parallelly, and then collect all the traces to form a pool and then run the SGD update for several times. The parallelism of the PPO on google football is tested on a workstation with an Intel i9-7900 CPU, the result of which is shown in the following figure, where FPS stands for the total steps per second and the yellow line stands for the standard deviation of the FPS.
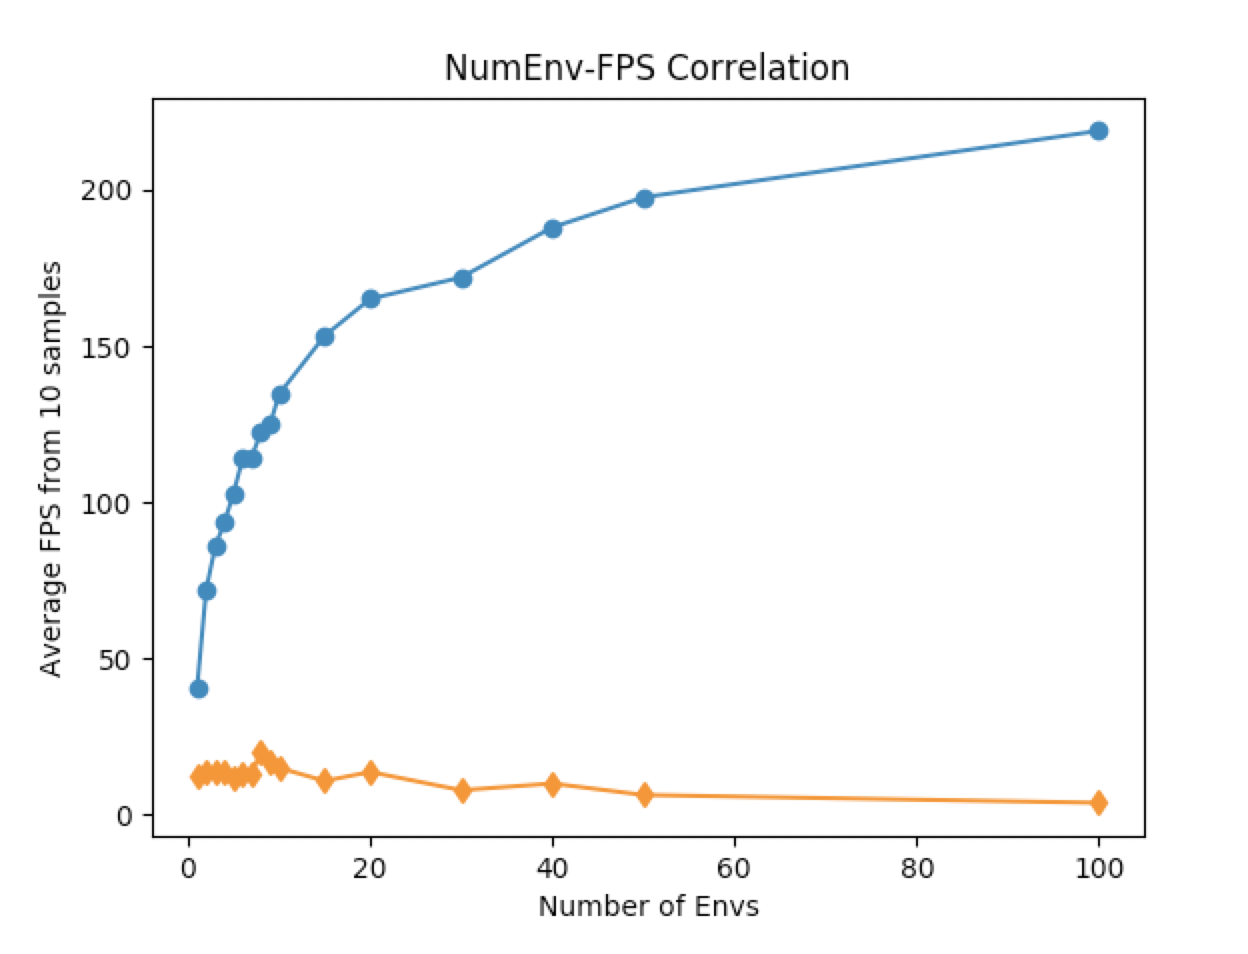
The reason why the number of the environments could be larger than the number of the physical cores and still gain performance improvement is that the PPO implemented by OpenAI baselines package is totally synchronous, which means that the environment stepping and the parameter updating is performed completely sequentially. The future work of the google football is highly likely to be deployed on distributed systems, making PPO algorithm and performance analysis less important.
Accuray Performance
The pure PPO algorithm achieves a remarkablely high accuracy after 2M steps, sometimes with over 90% (or even 100%). While it may crash and get stuck at some local optimal point. The detailed record of the accuracy is lost, but you could check out the inference demo by clicking this link on google drive.
GFootball Code Analysis
Personally I don’t think diving too deep into the google football environment code is a fantastic idea, for the detailed implementation should always be hidden from us users, unless there are some bugs you can’t wait to be fixed by the developers and you want to DIY (then I guess you must be super super gooood).
In this section, we will start with the overall structure of the google football project. Then we will list and explain all the exposed interfaces that you might need when developing your own algorithms. Finally we will cover some valuable issues.
Overall Structure
First of all, the whole project is composed of 2 major parts: football engine and football environment. The football engine is written in C++ because it involves the OpenGL rendering and should be highly optimized to improve the responsiveness. The football environment is written in Python and is wrapped gym-likely (OpenAI gym) for better compatibility with the machine learning community. When installing the google football package, it will first compile the football engine and generate a dynamic library called gfootball_engine.so, which could be invoked by Python file using import statement (for more information about how to write the C++/Python Interface, please check the boost.Python C++ library).
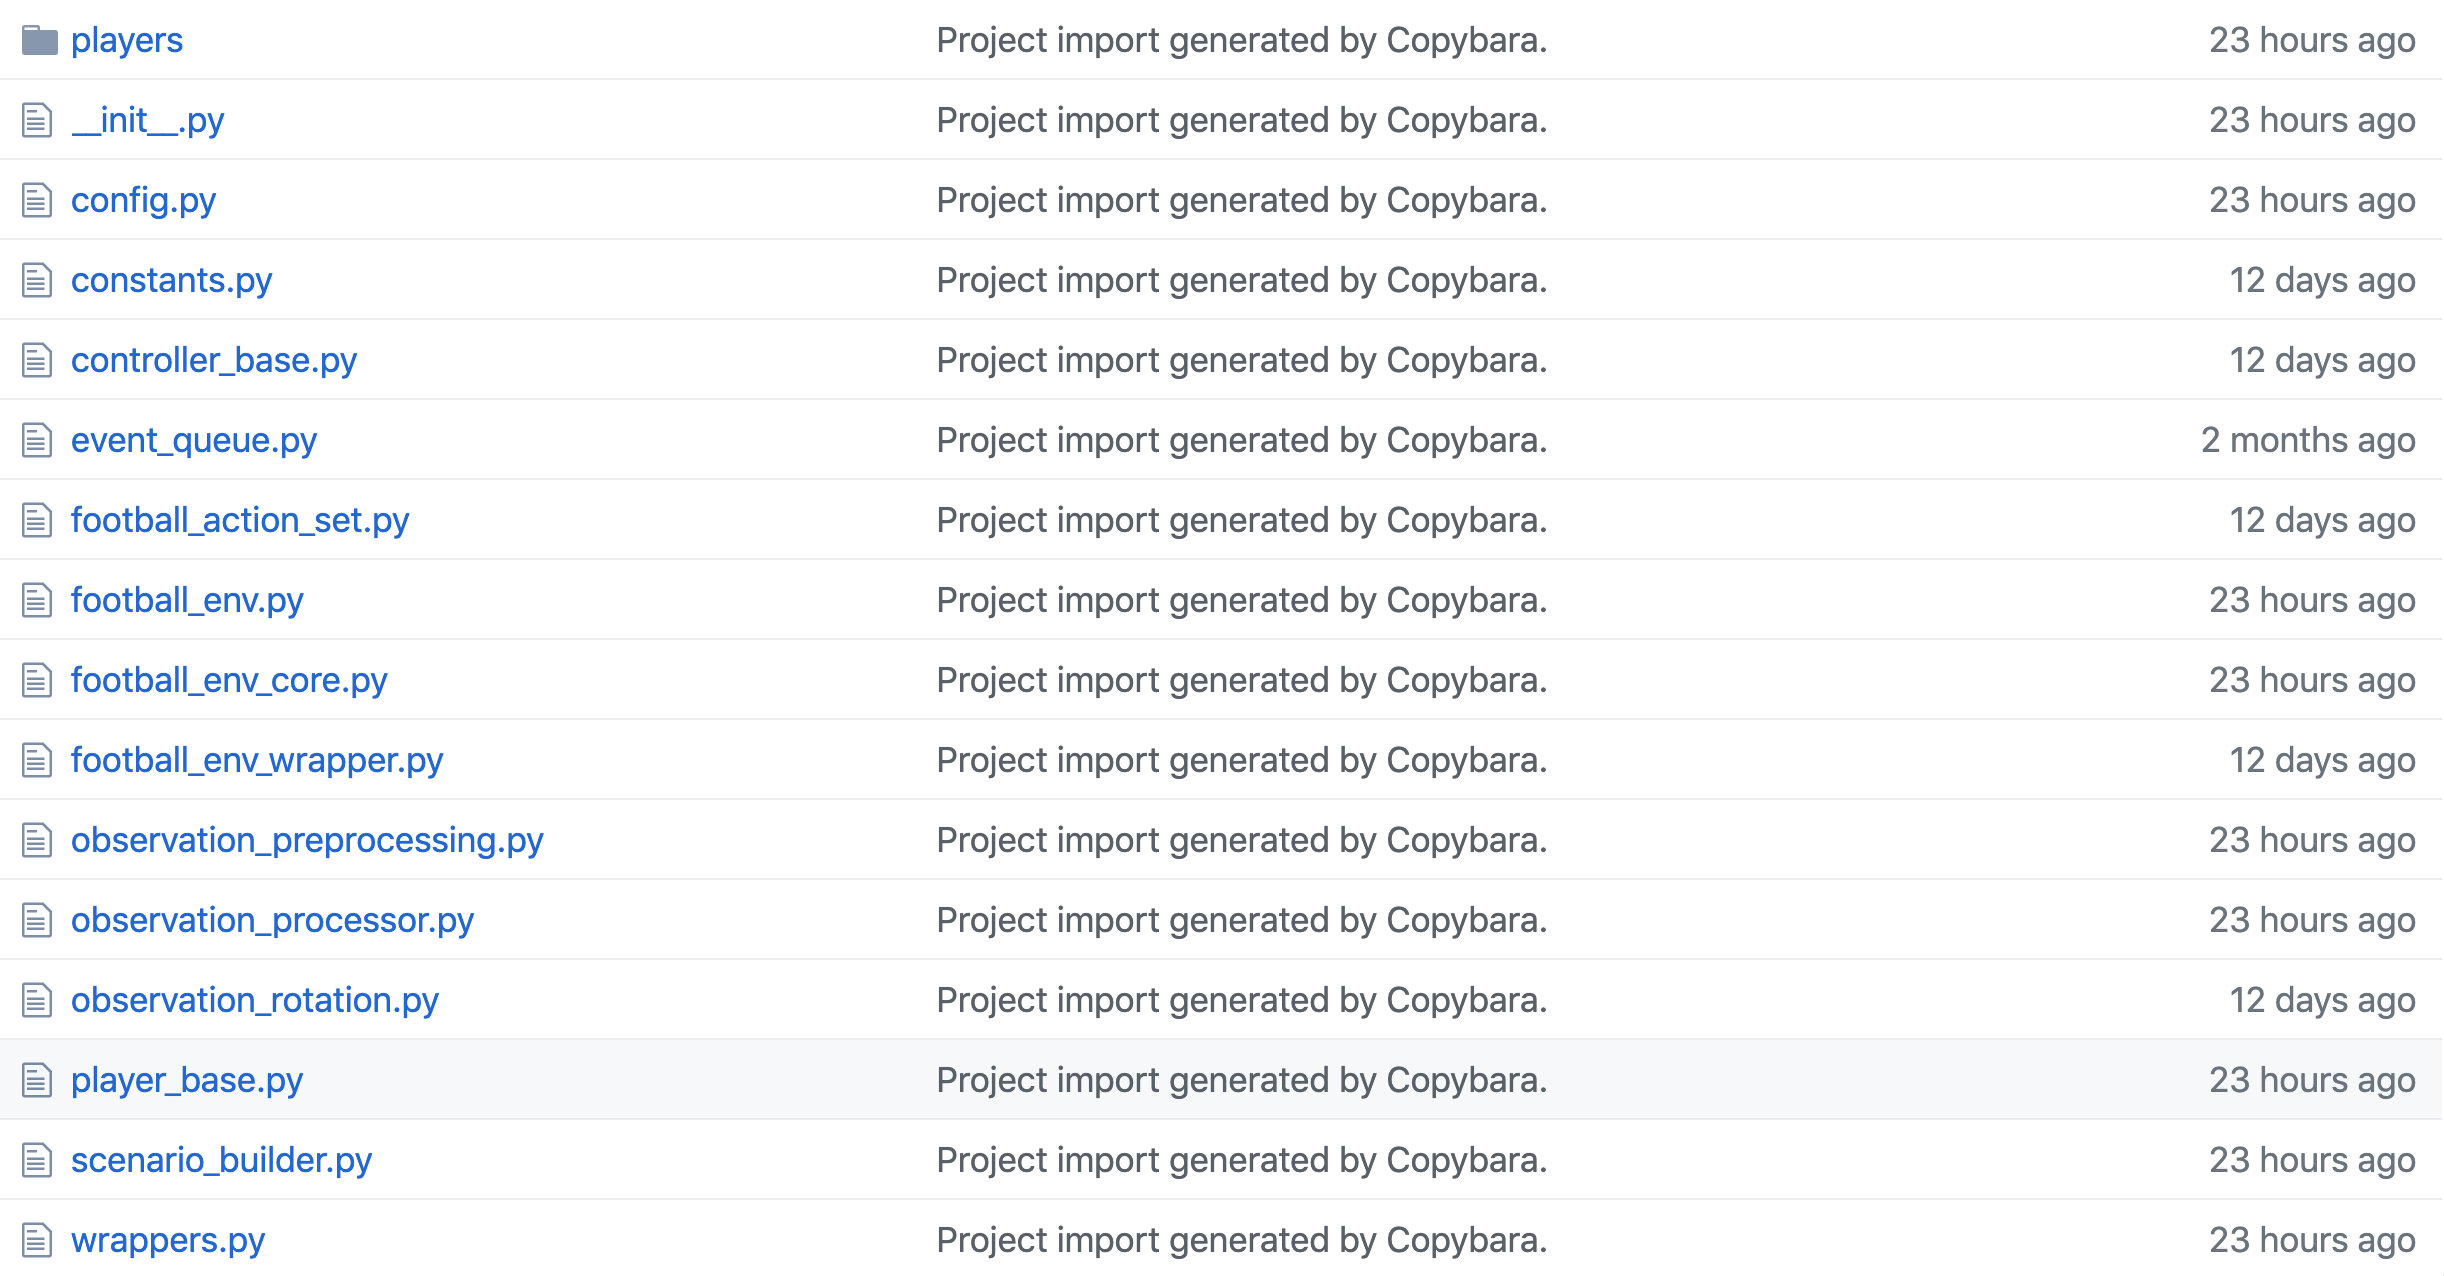
Our main focus is the gfootball environment construction, which is implemented in the directory /gfootball/env. The stream of creating the final environment object FootballEnv (in /gfootball/env/football_env.py) goes through at least three wrappers:
- First,
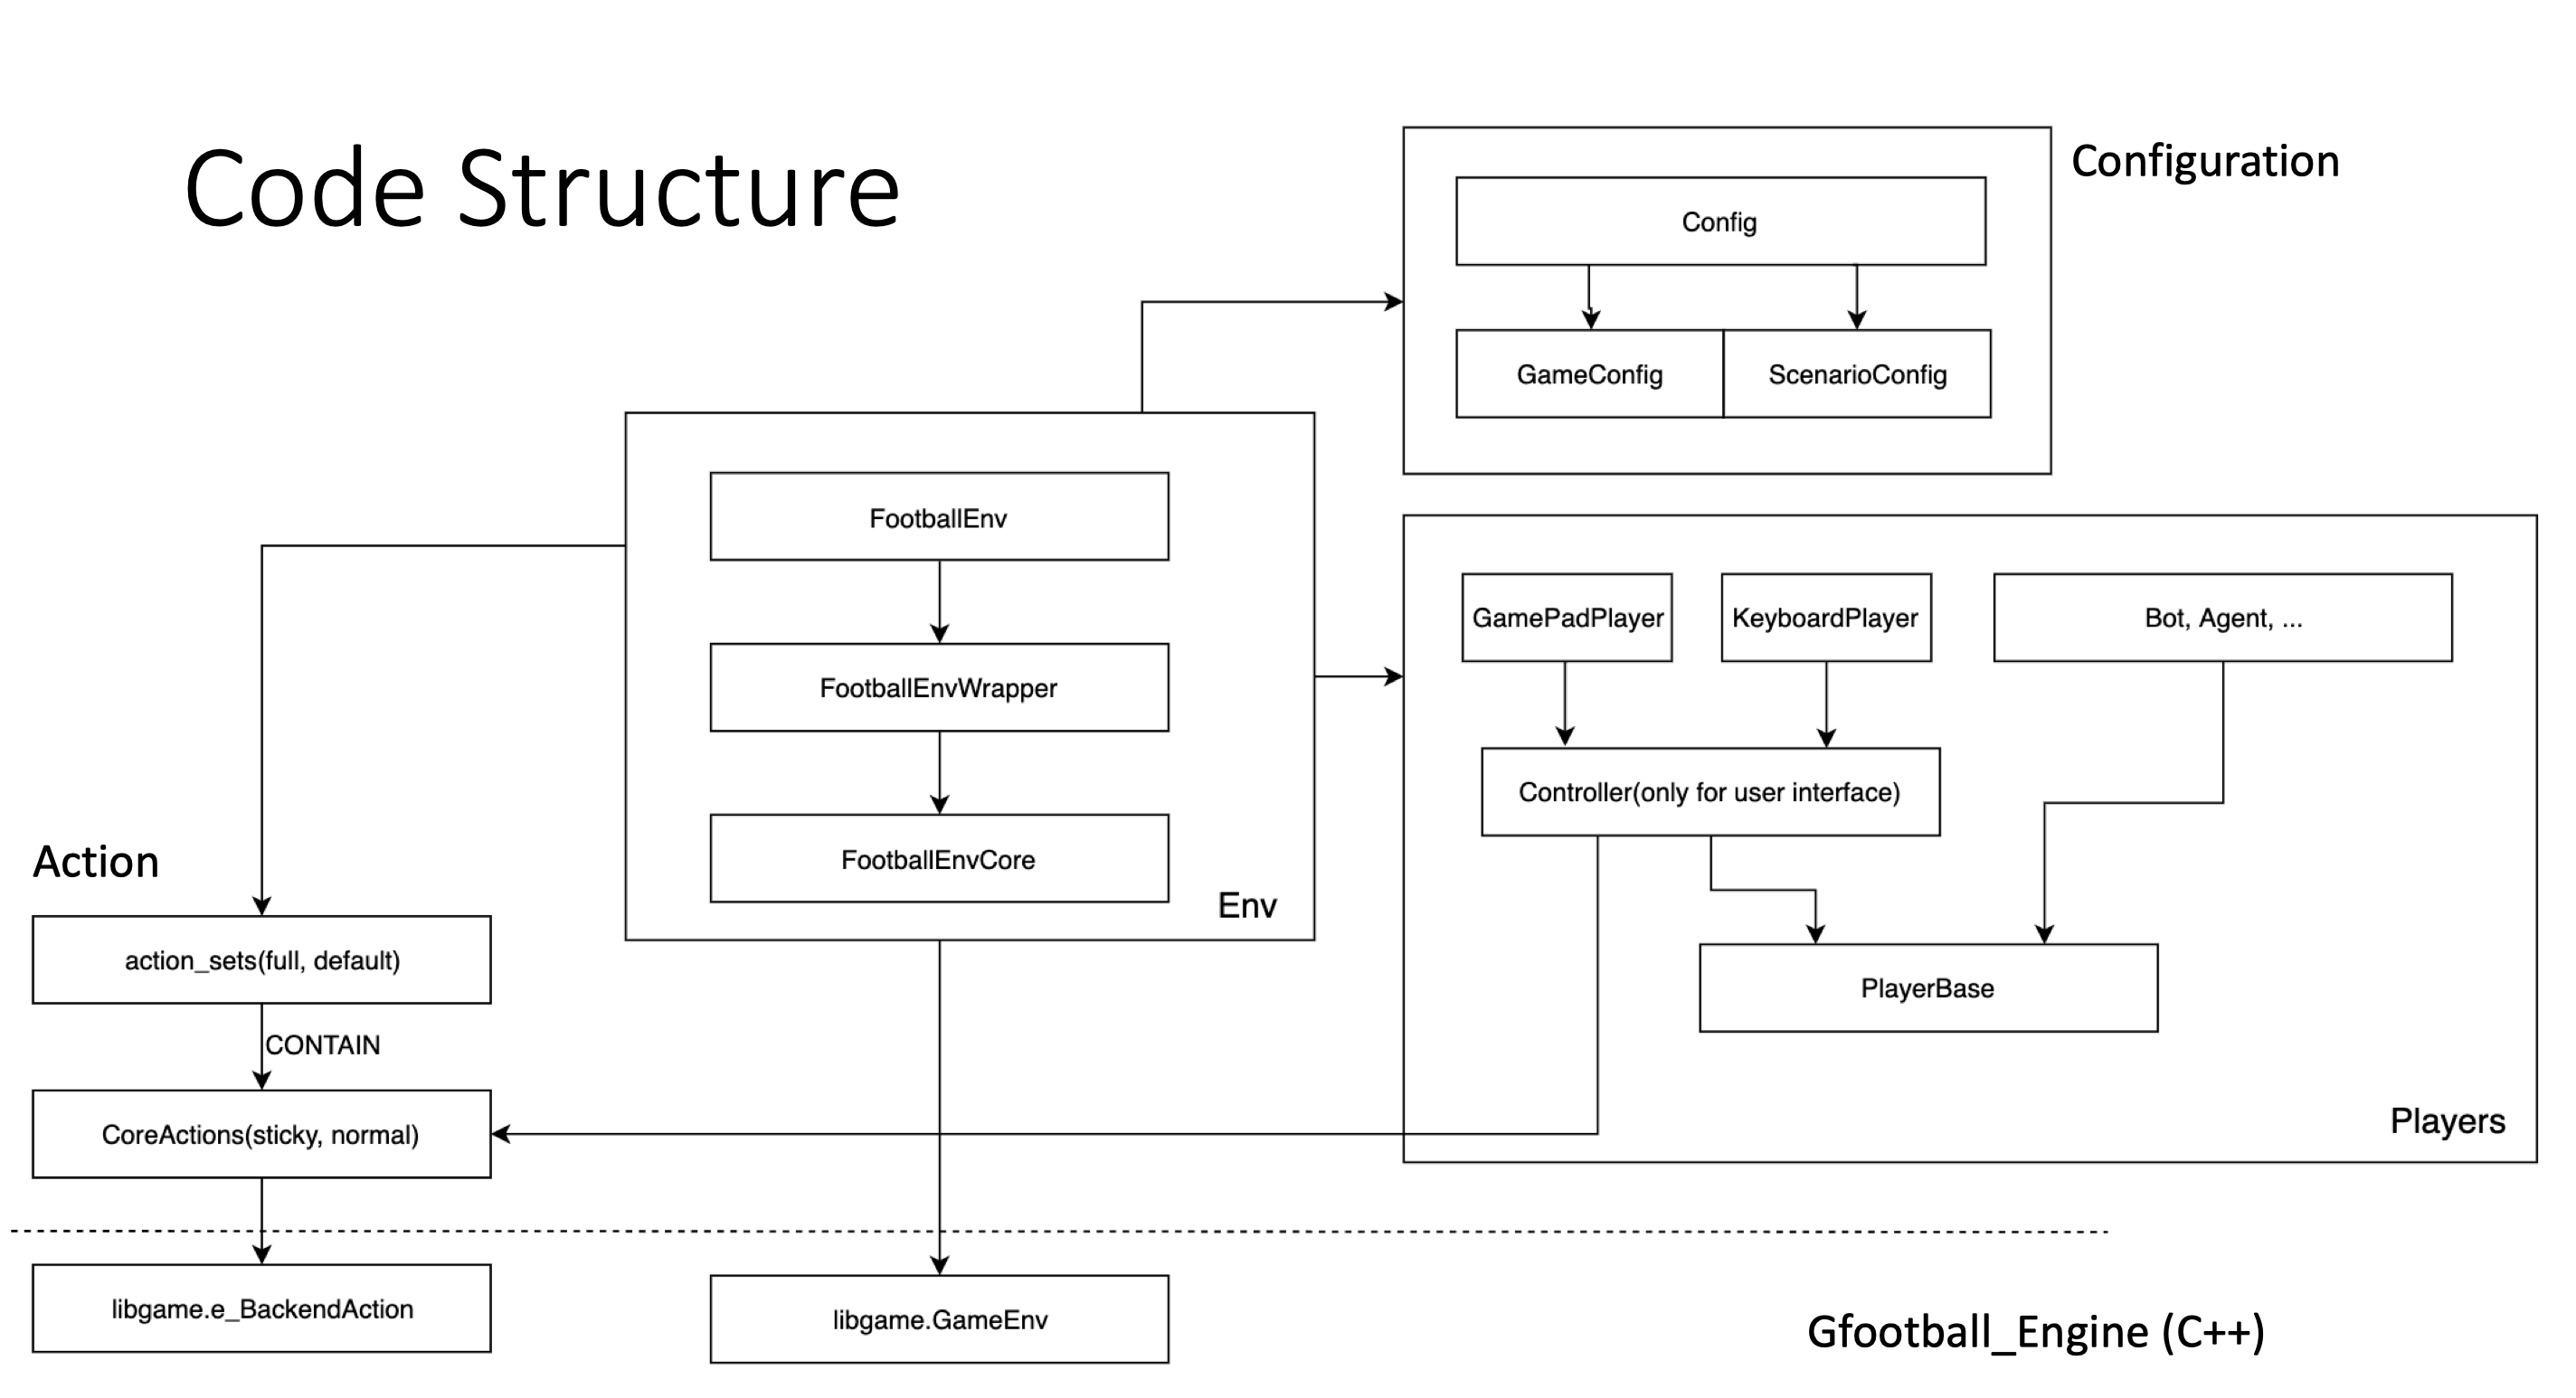
FootballEnvCore(in/gfootball/env/football_env_core.py) interacts directly with the football engine, creates in total 11+11controllersfor every player, and most importantly, realizes the gym-like environment API includingresetandstep. - Secondly,
FootballEnvWrapper(in/gfootball/env/football_env_wrapper.py) follows the same API standard and implements additional ‘writing_dumps’ function. - Finally,
FootballEnvinherits theFootballEnvWrapper‘s API and loads the player algorithm by_constructin_players.
After that, multiple wrappers could be used for a much more customized environment, as shown in the function create_single_environment in the file /gfootball/env/__init__.py. For more informationn about the wrappers, please check out the classes in /gfootball/env/wrappers.py.
The overall structure of the code is demonstrated in the following figure. To note that there might be some changes in the latest release, it’s better for you to check the newest version of the code and not get trapped in this article.
Interfaces
1. General Configuration
The configuration of the environment could be found in file /gfootbal/env/config.py and``. The important configuration paramters that might be used in the future include (you should double check it yourself):
- action_set: a string deciding allowed actions. The dictionary defining the string-action_set mapping resides in file
/gfootball/env/football_action_set.py. - dump_full_episodes: a bool deciding whether dumps the full episodes to the disk when training.
- game_difficulty: a real number from 0 to 1 indicating the responsiveness of the bot, {easy: 0.05, medium: 0.6, hard: 0.95}.
- level: a string of the scenario name deciding which
scenarios/file should imported. - real_time: a bool ddeciding whether it’s real time for human player.
2. Scenario Configuration
It’s implemented in file /gfootball/env/scenario_builder.py, but should be used with the scenario_builder class as shown in any file in the /gfootball/env/scenarios/. There mainly interfaces that you will use when creating your own customized scenarios:
- SetFlag(name, value): directly invoke
config.set_scenario_value(), which is defined in theConfigclass. The related parameters are listed as follows (all of them):- deterministic: whether there is some stochasticity.
- end_episode_on_score: if score then end the episode.
- end_episode_on_possession_change: if possession of the ball is changed, then end the episode.
- end_episode_on_out_of_play: if out of play, then end the episode.
- game_duration: how many steps of the environment before ending it forcely.
- offsides: whether offsides judegement is introduced to the games.
- SetTeam(team): set current team (left/right).
- SetBallPosition(ball_x, ball_y): set the position of the ball.
- AddPlayer(x, y, role): add a player to the field.
One typical way of using this interface is to rewrite a scenario builder as /gfootball/scenarios/11_vs_11_easy_stochastic.py:
1 | from . import * |
3. Player Interface
The player interface is well defined and easy to implement. Just all you need to do is to load your own trained model and reimplement the take_action method as the rest of the player files residing in the folder /gfootball/env/players.
4. Reward Interface
The paper proposes two ways of giving reward to an agent, one of which is called ‘checkpoint’. The checkpoint reward wrapper CheckpointRewardWrapper is implemented in the file /gfootball/wrappers.py and it inherits from the gym.RewardWrapper class. The only thing that we need to do to customize our own reward mechanism is to implement reset() and reward() method.
Related Issues
Several related issues were raised and (nicely) solved by the google football team. Firstly, the latest release supports multi-agent training and self-play. Secondly, about the FPS evaluation, the whole environment interacts with the agent in a synchronous way while it could be confusing when compared with playing with human, this issue was solved just lately. Last, about not able to change the active player, the only answer we got is that it’s not exposed to us users thus modifying it needs to dig down to the C++ engine.
Last Words
Thank you for reading this article. I would be super happy even if it only helps you a little bit! Wish you good luck! If you have any question, please do not hesitate to contact me via my email at the bottom!